
—Commander Eligor Dawnbringer
This bitchhhh is the bane of my wow career!

Words can't describe how much I hate this, although I usually die on ground stuff due to my high latency, but this is just about the most unforgiving ever.
The [censored] Heigan dance.
No idea how some people manage, maybe it's just my crappy pc + crappy connection, but I have managed to fix my Thaddius issues as well as my Flame walls in OS. I don't die on them anymore (unless I get a huge lag spike).
So here's a collection of stuff I got on the web, for quicker referencing. I know the guys who go here and view my blog DO NOT NEED THIS AS THEY ARE EXPERTS IN THE DANCE but like I said its for me or people who might prolly need it (aka not you and you know who you are wink wink)
So here it goes, from strategies I copy-pasted as well as some maps and links and whatnots and whathaveyous:
From worldofRaids:
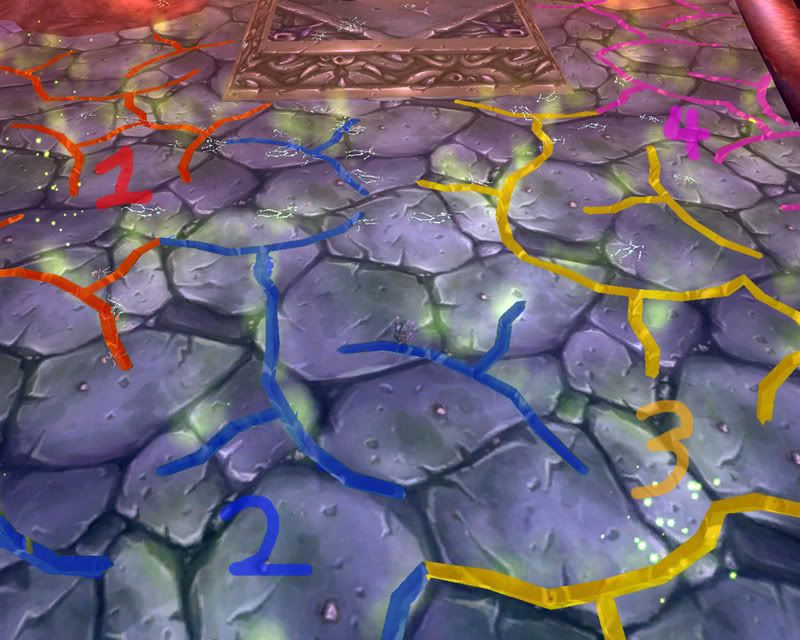
So, in an effort to have less laughs at people for failing miserably on Heigan... I drew this up.
I've gone this entire fight with 600ms and only got hit once, using this.
http://img.photobucket.com/albums/v6...208_001233.jpg
For those that don't understand. The large green lines are the section breaks.
The thin green lines are the cracks in the ground that I personally use to judge.
Arrow into the room is the entrance, and the arrow out is to the gauntlet, hopefully you understand that.
1 - Use the "Martini Glass", the very tips of the "glass" press against the zone switch. This crack presses directly up against Heigan's platform, and you can in fact stand very close to his platform. This is advised if you do not have an unholy DK, or any other speed boost.
2 - The large gap between cracks in the middle, this is the switch point. The line for 3 starts just before the base of the shape directly under 3.
3 - Another "Martini Glass", and a small gap between the Glass and the next crack in the ground. Line for 4 starts in this gap.
In 10 man at least, if you position yourself at the edge of 1-2 just before he starts the fast dance, you should be able to get to the edge of 2-3, and from there 3-4, well before the explosion.
Hope this helps someone.

from wowwiki:
Tips
* For the melee dance it's 1-2-3-4-3-2-1-2, for the everyone dance it's 1-2-3-4-3-2-1-2-3-4-3-2 (everyone dance is much faster timing than melee dance)
* The closer you are to the platform the shorter the distance you have to run around the room; the farther away from the platform you are, you will have to run longer distance between waves.
* Whenever a phase change occurs, the safe zone is reset to zone 1.
* Safe zones move in the following order: 1 - 2 - 3 - 4 - 3 - 2 - 1 - 2 - ...
* Use Smoke Flares or Basic Campfire to mark the safe zones for people to run to.
* Aggro does NOT reset between phases.
* Due to latency, other players may or may not appear in the correct position for you. Move at your own pace, do not try to follow other players.
* One of the most common reasons for death is running too far on either side of the room. If you are running from section 3 to section 4, you only need to take a few steps (between other pieces, you need to cross the entire next section, something not necessary for their sections one or four). It is possible to cast in the time this buys.
* Safe zone cycle is, for phase one: 1-2-3-4-3-2-1-2~3. So, it is the way to 4, back to 1, and then almost to 3. It is this way at least for 10man. At the moment Heigan teleports, move QUICKLY back to zone 1. It will reset the cycle to zone 1 again.
* There is no enrage timer on this fight, so it can go on as long as you can keep some sort of DPS up. Heigan has been killed in fights taking longer than 30 minutes (due to deaths.)
* One problem starter groups can encounter on this fight is the massive disease wave that occurs as the phase 2 dance transitions back to Phase 1 DPS. Everyone will be grouped up when they're dancing and Heigan can easily drop Decrepit Fever and hit the entire raid (20 yard range effect). Remember that nasty spell hits for seven 3K nature damage ticks on 10 man AND reduces health by 50% (i.e. a toon with 18K health or less will die in 3 ticks). Disease cleansing is critical and makes a Shaman or Priest very useful. Priests should use the abolish disease spell, casting it on raid members BEFORE the end of the dance. Shaman should make sure their disease cleansing totem is still up, preferably at the edge of the platform where it won't be hit by eruptions. The Abolish Disease will tick as the phase changes and therefore cleanse most of the raid immediately.
From Tankspot!
http://www.tankspot.com/forums/f206/41872-naxxramas-heigan-unclean.html
Encounter Information
Raid begins at quarter 1, ranged on platform.
Phase 1: 1-2-3-4-3-2-1-2-Teleport (raid moves to quarter 1).
Phase 2: 1-2-3-4-3-2-1-2-3-4-3-2-Engage (move him back to Quarter 1; ranged return to platform).
Want to focus on just the movement? Skip to the 5:11 marker and turn your sound off.
Some german wow website:
/console CameraDistanceMaxFactor 4

Links list:
elitist jerks:heigan
wowwiki
tankspot
angryraidleader
forumsss
Update:
Postby Elsie » Wed Dec 10, 2008 11:24 am
Here's a KISS method of knowing where to go during phase 2. If you have trouble in phase 1, well, it's actually easily healable so long as DPS do not stand on a crack in the floor. A crack will deal multiple instances of the damage, where as you will take 0 or 7500 damage by standing on a non-cracked (and swinging through a non-cracked) area on the ground. A resto druid and CoH priest can easily handle this, and you can lust Heigan very far down.
Start in position 1. Watch the splash up. If your graphics are turns up, it leaves green sparkly crap in the area you have to go to. This effect lingers for quite a few seconds after the "splash up" effect. Don't stand where the green sparkly crap didn't come up. This way you'll never be not-far-enough into the next dance quadrant.
For example, you start in Quadrant 1. Splash happens. Green stuff sparkles in Quadrant 2,3,4. Move into the Green sparkly stuff. Wait.
Splash happens. Quadrant 1,3,4 have sparkles. Move into Quadrant 3 (obviously you know not to go backwards), better known as the next spot over with green sparkly stuff from the splash up. Wait.
Repeat.

No comments:
Post a Comment